Thursday 28 January 2021

Bobbins!


Next up, bobbins!
If you are anything like me, you might have thought these little thingies are universal 🤣 they are FAR from it. There are over 60 different types of bobbins.
To not overwhelm you with info, I will be talking about the only two I have encountered across 4 different machines/brands of domestic sewing machines. For an industrial sewing machine I highly recommend going to your brand supplier and asking for something specifically for your model number. I got a pack that said universal that looked exactly like mine that I got with the machine but it didn’t fit 😕
The two you are going to encounter the most are class 66 and class 15. Class 15 is your standard plastic bobbin with flat edges. I’ve seen this one in most domestic machines I have worked with (Elna, Bernina and Singer).
Class 66: this is a plastic bobbin that is the exact same sizes as the class 15, but it has significantly curved edges.
So what’s the big deal?
Class 15 can fit into most machines found locally (both drop-in and front loading bobbin systems). Class 66 fits only in machines with a drop-in bobbin system.
Most of the newer Singer domestic machines have a drop-in bobbin system. The bobbin is much more loose in its casing in comparison to other systems which means it is more forgiving when it comes to the shape of the bobbin.

Remember to keep your manual to refer to if you are unsure which one is compatible with your machine, and look carefully before just buying a bag and assuming they will work. Incorrect bobbins can mess up the tension and timing of your machine 


Sewing Machine Shanks


Since I found out the hard way that hardly anything for a domestic sewing machine is universal, I decided I'll be posting some helpful things for beginners
 

🙂

To start off, what shank is your machine?

Low shank: most domestic machines use a low shank. They are usually around 1,9cm long. For a low shank, it's much easier (and usually cheaper) to find compatible presser feet. They usually use snap-on feet. You can easily find multipacks of these on websites like bid or buy. The problem comes in if you have a machine with a "integrated even feed" system. Examples of these machines: Singer Featherweight C240 and Pfaff Passport 2.0. What's the big deal? That would be the width of the shank. The most common shank widths are 5mm and 7mm. This determines how wide your stitches can go when using for example satin stitch or zigzag. With the integrated even feed system, the maximum stitch with is 9mm and it usually has 20 or more programmable positions for the needle. This means the shank is also 9mm and snap-on presser feet will not work on it. Is there a solution? Yes! You can easily buy a universal adaptor (R20 from Stitch and Go) which means you can use any snap-on presser foot on the machine. Just make sure it's a good fit and it doesn't impede the extra attachment from the integrated feed system at the back of the shank. Since Pfaff, Viking and Singer are from the same company, you can go directly to any of the brand shops and get feet specifically for your integrated feed system, but they are usually extremely pricy (I got a quote for R3000 for 5 feet in comparison to my multi-pack that was R700 for 42)

Slant shank: this is a shank that is used on very specific Singer domestic models. You will need a slant shank adaptor to use snap-on feet from a multi pack on this machine. From what I've seen they aren't very common locally and you will probably need to import it.

Long shank: a long shank is used on most industrial machines. You can find long shank adaptors locally to be able to use snap-on feet on your industrial. I've found that Teflon feet and zipper feet are much cheaper for industrial machines anyway (I paid R35 per foot), but things like the ruffler foot for a longshank or a bias binding foot can get very pricey (R400 to R700). In comparison to the multi-packs that work out about R30 a foot.

I was a bit worried about the quality of the multipack, so whenever you're unsure go onto Amazon or Ebay and read up. I also compared the multipack to a branded Empisal presser foot set that I got and it was almost exactly the same.

I'll be posting photos of the different feet along with some tutorials in the next few weeks ðŸ™‚ chances are there are more feet than you will find any use for, but there are also some really nifty little gadgets in between. 

Just to clarify: universal adaptors only work for snap on feet, not for feet that screw on. Meaning if you have a walking foot for a low shank machine, you are only going to be able to use it on the lowshank machine and vice versa. 

Monday 8 January 2018

Corset Diary - Emerald Cockroach Wasp Part 2


More photos! Finally got the professional photos back! We went for a darker look, since the insect that was the inspiration for this project lays its eggs within a live victim (so creepy works :) ). We stuck to neutral colours with the rest of the outfit and wig to draw attention to the colour of the corset rather.

Model: myself
MUA: Stephan Venter https://www.facebook.com/stephanventermakeup/
Photographer: Shay Wood https://www.facebook.com/sheenawoodphotography/


Conclusion:
There are actually several things I would have done differently had I managed to plan my time more efficiently. I would have added more wire to the armour panels, especially the wider ones on the hips for a smoother finish. I would have rather laser cut the back spine panels for a smoother finish. I would have looked for a more appropriate front closure for the armour panels. I also would have started on my project sooner rather than trying to finish everything in a span of 2 weeks during holidays!


Tuesday 2 January 2018

Corset Diary - Emerald Cockroach Wasp, Part 1

When the 2018 theme for the Foundations Revealed contest was announced, I was delighted! My journey in corset making has always been very conservative, I tried to focus on decent construction techniques and well fitting patterns more than any form of embellishment or decoration. The insect theme gave me an opportunity to go all out and way out of my comfort zone. I decided I wanted something very colourful and different and started looking around at pretty insects to find inspiration. I found some pictures of the emerald cockroach wasp and ideas immediately started popping up. The more colourful version of the insect caught my eye rather than the more plain green and red.


The second step of my design process was deciding on the pattern. Several sketches from Scarlet Sapsford's book "100 Corset Designs" caught my eye. All of them were horizontally patterned and looked a lot like armour. And of course there was a Thierry Mugler design that also caught my eye:

With this in mind I decided on something with horizontal panels that should rather look like armour than the standard tightfighting form of a corset. I decided to make a base out of a standard corset pattern rather than trying to guess at the fit of the panels. I used Corsets by Caroline's "Lucille" pattern for the base. After making a toile, I laced the toile onto my tailoring doll, covered it in clingwrap and masking tape, and drew out the panels I had in mind. I also wanted something with the feel of a spine for the back panel.


At some point during the design process, I started feeling my design was boring. I re-attempted this whole process with clingwrap but the second pattern ended up looking even worse to me, so I stuck with the original idea. You will notice a pin in panel 7, it was to remove some of the volume out of the panel to enable it to lie slightly more taut against the hip.


I went to the fabric store several times, and every time something new caught my eye. For the "base" corset made from the Lucille pattern, I decided on a foil fabric with scales on in silver with a bit of a holographic effect on it, with a crochet lace overlay.


I distressed the lace slightly to take away the slight cobweb effect it was giving. I also embellished it with beads, sating cording as well as piping on the seams. I couldn't find the satin cord in black for some odd reason, so I painted it with black glitter paint to match the rest of the corset. All binding on both the base corset and the armour part was done in black grosgrain ribbon. I felt that satin might have been too shiny since I already went all out with everything else.


The end result for the base corset was the following:


I used spring steel for most of the base corset, pre-bent into shape in order to make a very strong base for the horizontal panels. I also used fusible buchram on the foil to make sure it doesn't stretch at all. The inside of the corset is lined with the densest weave satin I could find locally. I decided on a front lacing closure rather than a busk because I felt a busk did not suit the look I was trying to create.


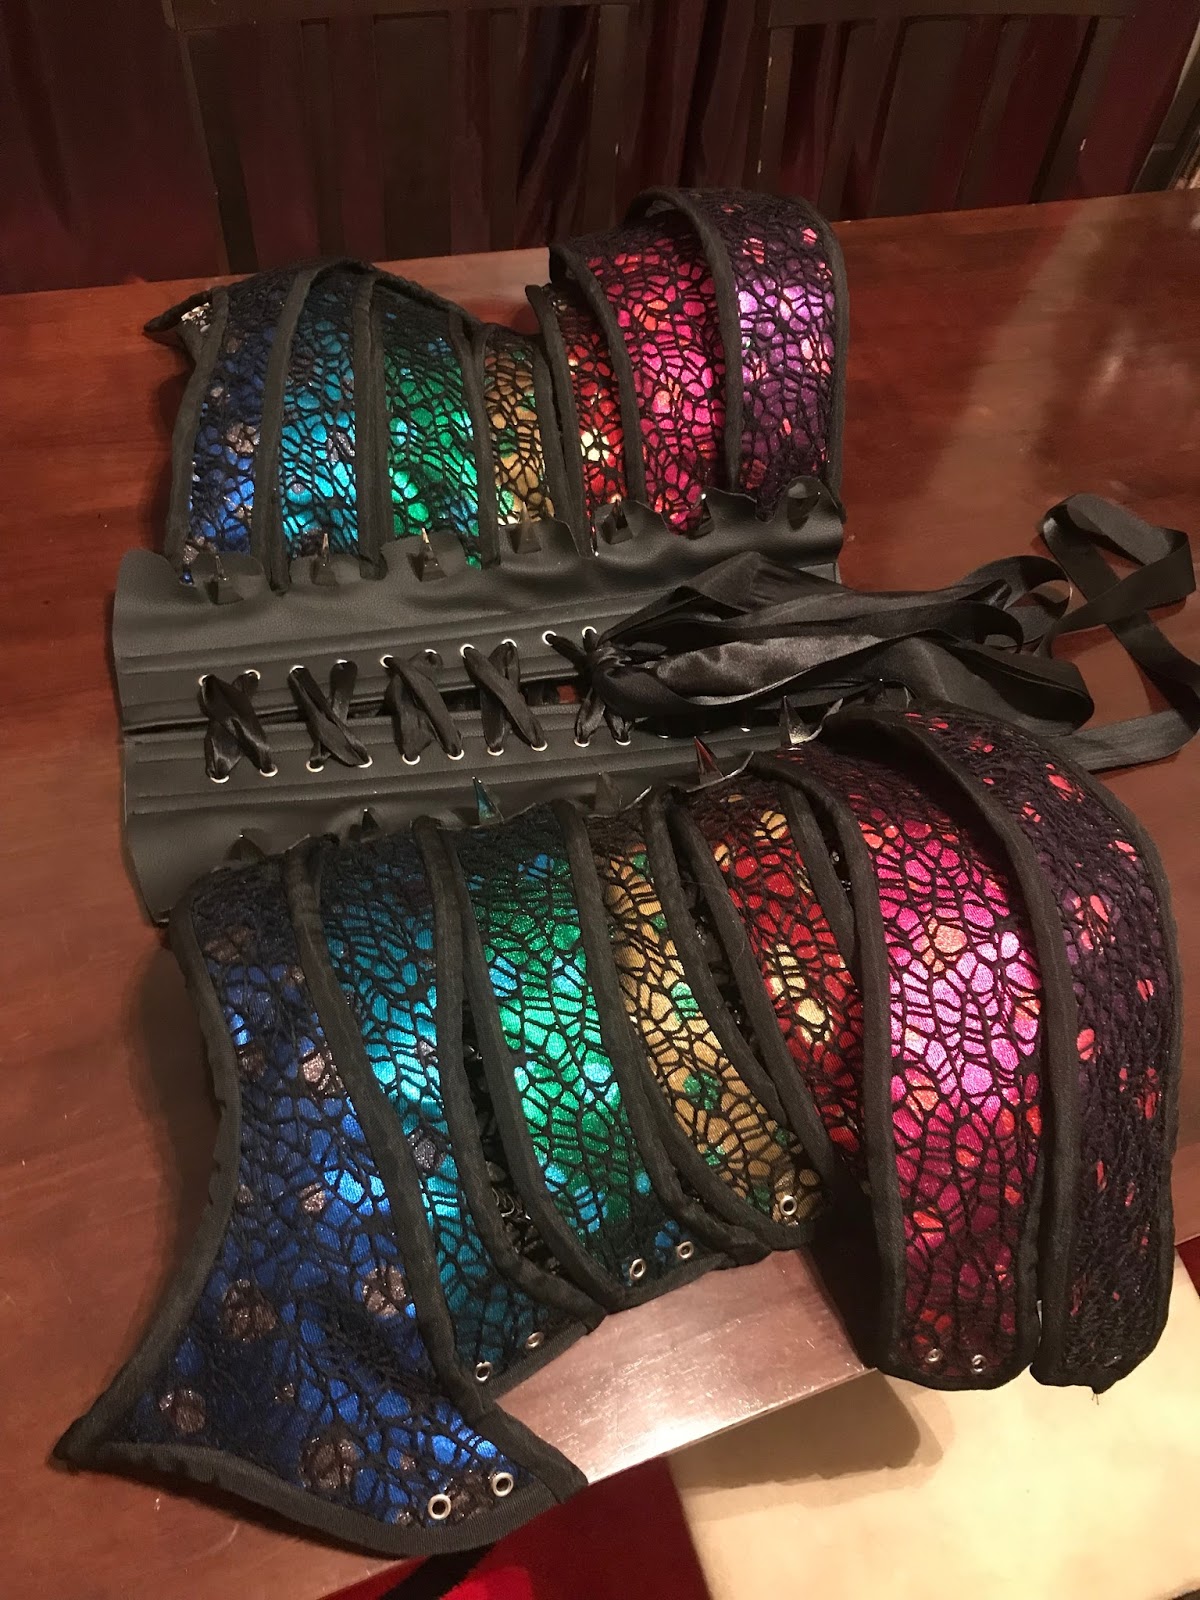
All of this, embellishment included, was the "easy part". For the horizontal panels, I decided on foil again, in 7 bright colours. I was lucky enough that between 2 friends of mine they had enough left over for me to be able to use it for my corset since most of the stores never has stable stock of anything. I also decided on the same crochet lace as an overlay accompanied with glitter tulle to add some bling.


I really liked the effect, but decided since I am going all out, I needed to add some glitter paint. I painted spots on each panel in the same colour as the panel to the top of it to make it seem more "blended" colourwise. To support the horizontal armoured structures, I used 1.6mm gauge galvanized steel wire, since it had enough support to keep the panels up but was still flexible enough to bend into the desired shape. I also lined the armour panels because the idea was that they can be bent open, almost in the same way that some insects' carapace can open up to show many different layers. Obviously I went with glitter again :) Originally I wanted to do wings with the same white and silver fabric as the lining of the armour panels, but the MUA and photographer for my shoot had a very limited timeframe during the holidays to get the work done, so I spent most nights up late working on the basics only.


I spent many hours handstitching the wires securely onto the armour panels, and then covering it with binding so it's not obvious on the back of the armour panels. After the completion of the panels, I tested the fit again.


I cut the back panels out of black bonded leather to create the "spine" I wanted. I attached the armour panels with dragonclaw spikes that could be screwed in. I decided to not do binding on the back panel since ideally I would have wanted a lasercut spine if I had more time.


I also did front lacing on the armour panels in order to keep them exactly where I wanted them. I laced the armour layer and base together as "one corset" to make it easier to get into (and no, it was still a hell of a mission to get on!). I decided on plain black for the rest of the outfit for the shoot, so the corset stands out and so we can do whatever with the makeup :)

Professional pics to follow!


Bobbins!

Next up, bobbins! If you are anything like me, you might have thought these little thingies are universal they are FAR from it. There are o...